Custom moss letters on wall

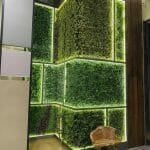
Creating custom moss letters on a wall is a unique and visually appealing way to add natural, green decor to your space. Whether you want to spell out a name, a word, or a message, moss letters can bring a touch of nature indoors. Here’s how you can create custom moss letters on a wall:

Custom moss letters on wall

Materials You’ll Need:

  1. Wooden Letters: You can purchase pre-cut wooden letters at a craft store or cut them yourself from a sheet of plywood or MDF.

  2. Preserved Moss Sheets: Look for preserved moss sheets, often available at craft stores or online. Preserved moss is treated to maintain its color and texture without needing to be watered.

  3. Hot Glue Gun and Glue Sticks: A hot glue gun is the primary adhesive for attaching the moss to the wooden letters.

  4. Scissors: To trim and shape the moss sheets.

  5. Paper or Cardboard Template: Create a template of your desired letter shape to guide the moss placement.

  6. Hanging Hardware (if needed): Depending on the size and weight of your moss letters, you may need hanging hardware to secure them to the wall.

Step-by-Step Instructions:

  1. Plan Your Design:

    • Decide on the letters or word you want to create with moss. Sketch out your design on paper to determine the size and layout.
  2. Prepare the Wooden Letters:

    • If you’re using pre-cut wooden letters, they are ready to go. If you’re cutting your own, trace your paper template onto the wood and carefully cut out the letters using a saw or a jigsaw.
  3. Trim Moss Sheets:

    • Lay the preserved moss sheets flat and use scissors to trim them into smaller pieces that will fit the contours of your wooden letters. You can trim the moss into irregular shapes to create a more organic, textured look.
  4. Glue Moss to Letters:

    • Heat up your hot glue gun and apply a generous amount of hot glue to the front surface of one of your wooden letters. Press the moss pieces firmly onto the glue, ensuring they adhere securely. Work one section at a time to avoid the glue drying too quickly.
  5. Repeat for Each Letter:

    • Continue to apply moss to each letter, following your design and making sure the moss covers the entire front surface of each letter.
  6. Press and Hold: After attaching the moss, press down firmly on the moss-covered letters to ensure good adhesion. Hold each letter in place for a few seconds as the glue sets.

  7. Arrange and Hang:

    • Arrange your moss letters in the desired order or arrangement on the wall. If necessary, use hanging hardware to secure them to the wall. Make sure they are level and evenly spaced.
  8. Maintenance: Preserved moss requires very little maintenance. Keep your moss letters out of direct sunlight and away from moisture to maintain their appearance. Gently dust them occasionally to remove any accumulated debris.

Custom moss letters can add a touch of nature and uniqueness to your home decor. Whether in a living room, bedroom, or any other space, they create a visually striking and organic focal point on your wall.

Looking For
Artificial Grass!

You’re in right place

Contact us


    Cart

    No products in the cart.

    Create your account

    [ct-user-form form_type="register"]