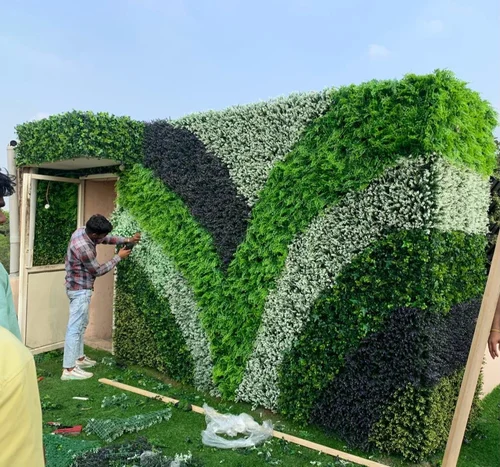
In the realm of modern urban living, the desire to incorporate elements of nature into our surroundings has given rise to a captivating trend – artificial vertical garden walls. These innovative installations offer a low-maintenance and sustainable solution for bringing the beauty and serenity of lush greenery into indoor and outdoor spaces alike. If you’re intrigued by the idea of creating your own evergreen oasis, this step-by-step guide will provide you with the essential knowledge and tips to build an artificial vertical garden wall that will elevate your living space.
Step 1: Choose the Right Location The first step in building an artificial vertical garden wall is selecting the ideal location. Consider factors such as available space, lighting conditions, and accessibility for installation and maintenance. Ensure that the chosen area provides adequate clearance for the desired size of your installation and allows for easy access during construction and occasional cleaning.
Step 2: Determine the Wall Structure Once you’ve identified the perfect spot, it’s time to determine the structure of your artificial vertical garden wall. There are several options to choose from, including freestanding frames, wall-mounted systems, or even repurposing an existing fence or trellis. Each option has its own advantages and considerations, so carefully assess your spatial constraints, desired aesthetic, and budget.
Step 3: Select the Artificial Foliage The key to creating a truly captivating artificial vertical garden wall lies in the selection of high-quality, lifelike foliage. Look for products crafted from durable, UV-resistant materials that accurately mimic the textures, colors, and intricate details of real plants. Consider incorporating a variety of plant species, including trailing vines, upright stems, and lush greenery, to create a visually stunning and diverse composition.
Step 4: Plan the Layout and Design Before assembling your artificial vertical garden wall, take the time to plan the layout and design. This step allows you to experiment with different arrangements, color palettes, and textures to achieve the desired aesthetic. Consider incorporating accent lighting, water features, or other decorative elements to further enhance the ambiance and create a truly captivating outdoor space.
Step 5: Assemble and Install With your design finalized, it’s time to assemble and install your artificial vertical garden wall. Carefully follow the instructions specific to your chosen wall system, ensuring that all components are securely fastened and properly aligned. This step may require the assistance of additional hands or professional installation services, particularly for larger or more complex installations.
Step 6: Add the Final Touches Once your artificial vertical garden wall is installed, it’s time to add the final touches. Carefully arrange and secure the individual foliage pieces, paying close attention to creating a seamless and natural-looking composition. Consider incorporating accent lighting or other decorative elements to further enhance the visual impact and create a warm, inviting atmosphere.
Step 7: Enjoy and Maintain Sit back, relax, and enjoy the beauty and tranquility of your evergreen sanctuary. Unlike living walls, artificial vertical gardens require minimal maintenance, making them a hassle-free addition to any indoor or outdoor space. Regular light cleaning and occasional dusting will help ensure that your installation remains vibrant and pristine for years to come.
Building an artificial vertical garden wall is a rewarding project that allows you to bring the beauty and serenity of nature into your living space without the demanding maintenance requirements of traditional living walls. With proper planning, high-quality materials, and attention to detail, your evergreen oasis will serve as a captivating focal point and a serene escape from the hustle and bustle of everyday life.


